

New Zealand — Firearms Licence
New Zealand · Firearms Licence
Specifications
| Country | New Zealand |
|---|---|
| Document type | Firearms Licence |
| Passport / visa picture size | Width: 35 mm, Height: 45 mm |
| Aspect ratio | 7:9 (35 × 45 mm) |
| Resolution (DPI) | 600 |
| Required file size (digital) | — |
| Head in photo | Head must be between 70 to 80 % of the photograph from the bottom of the chin to the top of the head |
| Background color | White — plain and evenly lit unless your issuer specifies a different tone. |
| Printable photo | Yes |
| Digital photo for online submission | Yes |
| Digital photo size (pixels) | Width: 1800 px, Height: 2400 px |
| Photo paper type | matte |
Official Source
New Zealand Passports (DIA) — passport photo requirementsFAQ
Bullets are grouped from this country’s requirement text and spec fields. If a topic has no matching lines in our data, we show common international-style guidance—always confirm with your issuer.
1.Photo basics & quality
- Final print size for this preset: 7:9 (35 × 45 mm).
- Attach these photos to your application form. Your photos must be:
- 35mm x 45mm untrimmed
- taken not more than 12 months from when you supply it
- a good likeness of you
- printed on good quality paper
- Always confirm the latest rules with the official issuing authority or online application portal before you submit.
- Dimensions for this preset: 35 × 45 mm (7:9 (35 × 45 mm)).
- Suggested print resolution: 600 DPI (confirm with your issuer).
- Typical digital dimensions when specified: 1800 × 2400 px (confirm upload requirements).
- A printable physical photo may be required for this document type (when applicable).
- Online submission with a digital file may be required (check the current application flow).
- Photo paper when printing: matte.
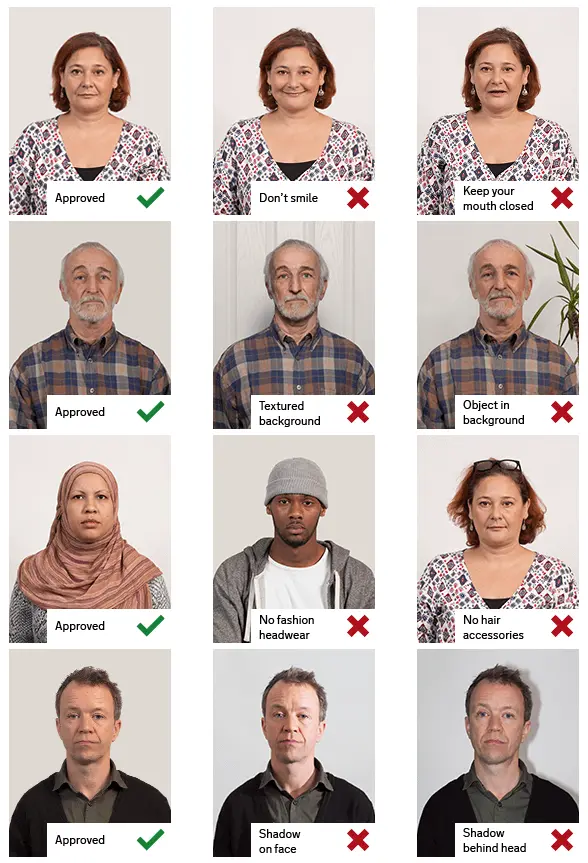
2.Pose & expression
- a full front view of your face, head, and shoulders, with your head filling most of the photo
- Head size in frame: Head must be between 70 to 80 % of the photograph from the bottom of the chin to the top of the head
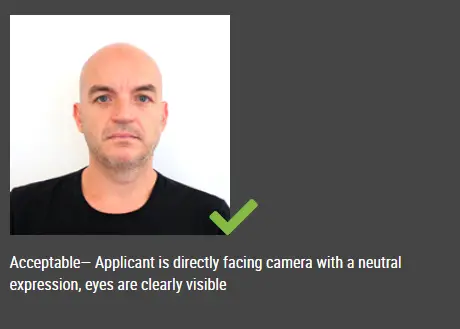
3.Attire & accessories
- taken without a hat or head covering unless you wear either for religious reasons
4.Lighting & background
- taken against a plain, light-coloured background
- Background (summary): White — plain and evenly lit unless your issuer specifies a different tone.
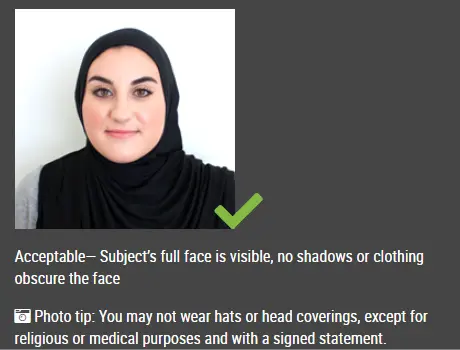
Visual guide
Illustrative reference photos served from a third-party CDN. Use only as informal guidance; follow your official instructions.

How an online passport photo generator typically works
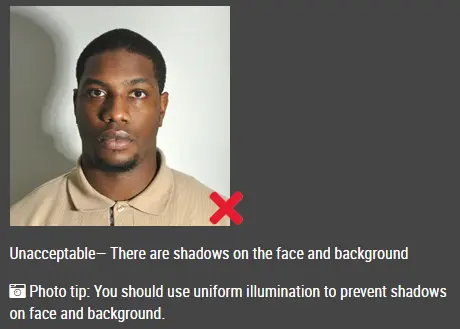
Avoid heavy shadows on the face and background
Even lighting and a clear, frontal face
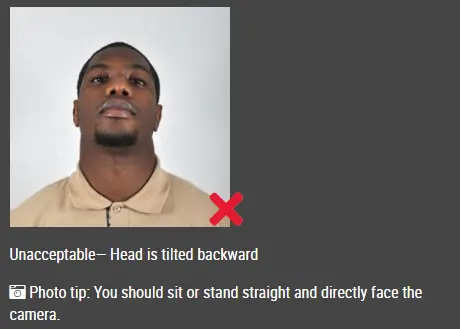
Head should not be tilted or turned away from the camera
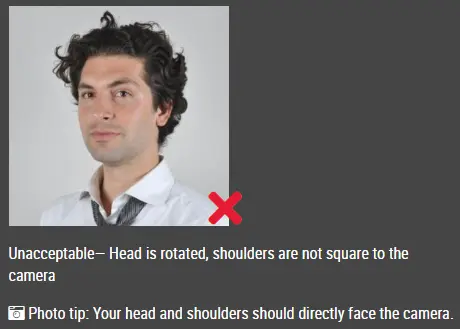
Keep the head straight; do not rotate the face
Face the camera straight on with shoulders visible
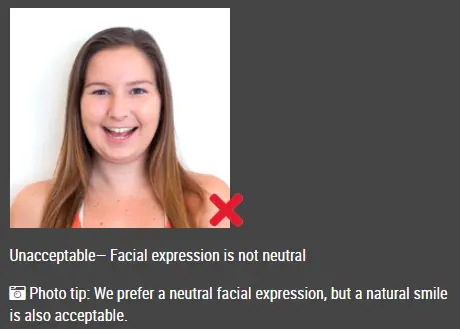
Avoid exaggerated smiles or an open mouth when a neutral look is required
Good and bad sizing / framing examples
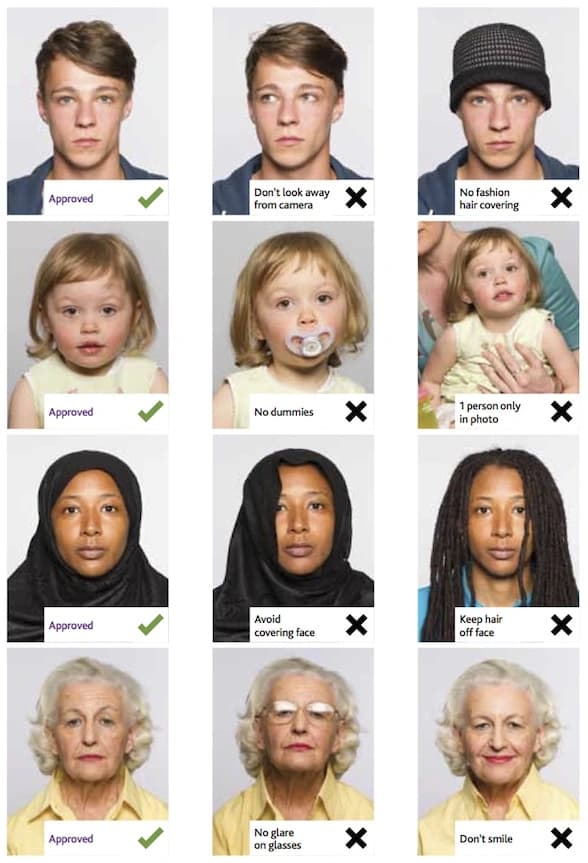
Printed photo strips (layout reference)
How to make this photo
1.Step 1: Use a digital camera or a smartphone
- —Find someone to take the photo for you and selfie photo is not acceptable for passport photo application. If you have a tripod, use it. A tripod will make it easier to keep the camera steady and level. The distance of the person to the camera should be around 1 meter.
2.Step 2: Find a venue with good lighting
- —When taking photo, you should face the light, such as a nice bright window or the door. This can provide even lighting to avoid shadows on the face and background. The face must be evenly lit. There should be no shadows and glares on the face.
- —Note: A simple wall is fine; you can tidy or replace the background while editing.
3.Step 3: Wear properly for your passport photo
- —Do not wear uniforms. Wear regular street clothes in your photo.
- —Do not wear eyeglasses. If you wear glasses, sunglasses, or tinted glasses, take them off for your passport photo.
- —Your face must still be fully visible. Don’t let your hair drape over your face and obscure your eyes. If you have very long bangs that cover your eyebrows, you should pin them back with bobby pins. It’s best if your ears show, as well, but that won’t cause your photo to be rejected.
- —No hats are allowed in passport photos unless it is religious headgear such as a headscarf or yarmulke that you wear every day.
4.Step 4: Pose for a passport
- —Look straight towards the camera with face straight on. Head should not be tilted or rotated.
- —Both ears showing or both edges of the face visible if hair covers the ears.
- —Shoulders should be visible, and there should be enough space around the head for cropping the photo.
- —Position the camera in the same height as the head.
5.Step 5: Have a neutral facial expression
- —You can smile in your passport photos, but the government prefers that you have a neutral facial expression.
- —Smiling or having your mouth open is usually not acceptable, especially under the new international passport rules.
- —Online Passport Photo Generator
Reference summary aligned with common third-party requirement listings. Always verify against the official embassy or visa center before you submit.